Even if you're not aware of it, you know Tom Binns. His statement pieces have bejeweled many an A lister, from Amanda Seyfried to Julia Roberts, and his designs are even favoured by the First Lady herself.
 |
| Michelle Obama, Julia Roberts, Rihanna. Source. |
"Binns has been designing, manufacturing and distributing jewellery for over twenty-five years. Beginning his revolutionary career in 1981, his creative inspiration was and remains the early twentieth century Dada movement, amongst whose themes were deliberate irrationality, anarchy, and the rejection of standard beauty and social organisation." [Source: Designer's own website, www.tombinnsdesign.com]
 |
| Amanda Seyfried, Kate Beckinsale, Britney Spears. |
Recently, Binns' jewellery has become increasingly colourful, juxtaposing clashing shades of neon brights and featuring intense metallic splashes across delicate pastels. You can peruse his latest collections here; be sure to admire the Gilded Pleaure collection. I did. In the past two years or so, we have seen these designs filtering down ever more readily and swiftly from the uppermost echelons of designer society and into the high street...
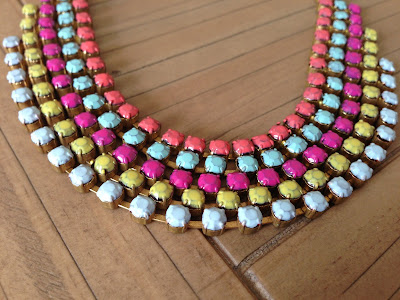
His inspiration is ubiquitous, visible not only in the jewellery counters, but also gracing the rails, where kaleidoscopic rhinestone embellishments abound. However, whilst some of the high street price tags are not to pinch your purse at, the higher end stores (J.Crew, for example) are still charging more than I would spend on a piece of statement jewellery, that I am frankly unlikely to to wear for more than a couple of seasons at most. Having said that, I do love the look, so I decided to take matters into my own hands, quite literally: rather than purchasing a high street imitation, I would create my own interpretation of a Binns necklace, one that was perhaps a little more classic and therefore easier to wear on a day to day basis...
Tom Binns Inspired Jewel Bright Necklace
Budget: Under £10
Time to allow: Approx. 2 hours, although this will depend on the number of rhinestones in your necklace
Difficulty rating: Relatively straightforward, provided you have patience and a steady hand!
Materials required: A rhinestone necklace/s, one with clear or at least pale stones would be preferable in case you are using light/translucent varnishes, though mine was in fact dark purple and coverage wasn't an issue.
1) I bid for and won this necklace on eBay for £9.99. I had thought I would find one for around about the £5 mark, but I was impatient to get cracking so I settled on spending more to secure an item I liked the look of that was ending soon! I have no doubt that you could find things online/in charity shops more cheaply than this.
2) Clean the surface of your necklace. Ordinarily, I would recommend nail varnish remover, but I was concerned that might affect the finish on the stones, so I just used a (barely) damp cloth and left it to air dry for five minutes.
3) Choose your nail varnish colours and decide on any pattern you might like to follow when painting your stones. For the purpose of simplicity, in terms of both method and end product, I stuck to plain straight runs of colour, but with a more intricately designed necklace, I think a geometric pattern would work really well. I chose a combination of bright and pastel shades, but I'm still considering adding some gold accents...
4) Paint each stone carefully. Don't worry about painting over the claws, as the Tom Binns pieces themselves have these covered. I used two coats of varnish on each stone (apart from my mint Essie colour, which I only ended up using one coat of since the coverage was perfect), ensuring each layer was dry before applying the next. I decided against applying a third layer in case the varnish became too thick and obscured the facets of the stones - you still want to see the shape of them. It might be worthwhile having some good music/a film on in the background - this is rather time consuming!
 |
| One coat. |
 |
| Two coats. |
5) Finish with a coat of top coat to seal in your colours and prevent chipping.
6) Leave to dry for 24 hours before first use - enjoy!
 |
I will try to post a better picture than this of the end result being worn - sorry, the light was not good and I find self portraits tricky enough at the best of times! I hope it gives you an idea at least...
Wishing you all a wonderful weekend. More to come from the little magpie tomorrow and on Sunday, so do drop by!
pp x


No comments:
Post a Comment